Monday 29 July 2013

Any one for tea?

Evening everyone

Well I can't believe how long it is since I updated my blog - where is the time going to?

This evening I thought I would share with you a card I made for my niece's birthday at the weekend.  She is a real teapot so what better card that one shaped like a teapot.

I made the whole card in CraftArtist, including the teapot shaped template so I will be able to use it again.  Once printed I cut the card by hand.

Here is the card

 
And of course it also had a matching insert.

I am pleased to say that my niece liked her card.

Thank you for visiting my blog.

Catherine x

Monday 17 June 2013

Handbags and Beer Mugs

Morning everyone

Well I definitely haven't been doing very well at  keeping my blog up to date so thought I would just do a quick post this morning.

I have been playing around in CraftArtist making templates for shaped cards.  I started with some for handbag shaped cards and then used different papers to make each card look slightly different.  I have also been playing around with different shaped handbags and it's still a work in progress.  But I thought I would share a couple that I have already made up - and as always, complete with matching inserts!


Both of these cards are approx 8 inches wide and fit into an 8x8 envelope.  They are tent style cards and the flaps (there is a matching one on the back) have been added separately to the card front - using thin foam pads on the lower flap.  The handles are decorative and tuck in under the flaps.  I finished both cards with a tag style sentiment handing from the handle.  The papers I chose are from two separate sources - the pink one is from Fifties Fever which is a DaisyTrail digikit.  The second one uses papers from Funky Hand.  The bow is from another DT digikit from Kreative Designs by Karen.

But of course we can't leave the men in our lives out so I also designed some beer mug shaped cards.
Here are a couple of them.


Both cards are approx 6 inches high and fit into a 6x6 envelope.  Once again I used Craft Artist to design them and they also have a matching insert.  The beer mug was from a Rob Addams cd "Large Cards" and the humorous artwork is from the DaisyTrail "Bloke" digikits.

I have really enjoyed making these shaped cards and hopefully will come up with ideas for more.

Thank you for visiting my blog.

Catherine x


Tuesday 14 May 2013

Hello everyone

Just another quick post from me this eveing.  This is another card I made using another of the backgrounds I made when I was playing with my distress inks.  While I was messy crafting I also had a go at making my own paper roses and have used some of them on this card too.

I have used some Reddy die cut decoupage, a punched border, toning stardream card and finished it with a ribbon and bow.

Thank you for visiting my blog.

Catherine x

Monday 13 May 2013

Canterbury Bell

Evening everyone.  I haven't had much time to update my blog recently so thought I would just quikly post a card I made today.  I had a messy crafting session using masks and distress inks yesterday so used some of what I did yesterday to make this card.

Here it is

I embossed and then inked a piece of Neenah card before cutting around it and mounting it onto darker toning stardream card.  The flower fairy I have used is Canterbury Bell - one of my favourites.  Some little gems and a sentiment finished the card off.

I did make another couple of cards today but will save them for another day.

Thank you for visiting my blog.

Catherine x

Tuesday 30 April 2013

Word Play Wizard

Hello everyone

Just a quick post from me today as I have lots to do.

This is another card I have made from the cd Word Play from Peerless Designs.  I really do like this cd!

This is an 8x8 card - the image of the wizard is from the cd and I have taken it into CraftArtist and added my own backing paper and some bits and bobs to make the background.  It is printed completely flat

And of course it also has a matching insert.

My other news today is that I have finally bitten the bullet and set up my own Facebook page for my cards.  It's called Charlie Cards and you can find it HERE so if you like my cards then please feel free to like and share my page.

Thank you for visiting my blog.

Catherine x

Thursday 25 April 2013

Benjamin Bunny

Well another blog post from me so quickly - very unusual at the moment!

This is a card I have just made for my friend Heather because she gave me three Beatrix Potter cds as a present and I wanted to make her a thank you card.  I know she likes Benjamin Bunny so that is the image I have used from the deooupage section of the cd.

Here is the card

 I took the decoupage sheet from the cd and a couple of backgrounds into CraftArtist and digitally cut out layer one of the decoupage and then resized it.  I used one of the background papers as a background and the second one as a material to make a rectangular mat.  I made the oval mat, ribbon and sentiment myself and added a bow.  I printed out onto Neenah card and did an additional image of Benjamin Bunny which I sprayed liberally with Spray and Shine and then added using Collal glue get.  As I was about to add it I realised that Benjamin Bunny's whiskers were missing so used a pencil to draw them in, copying the original image on the cd. The background has been layered onto matching green Coredinations card.  And of course I added a matching insert to finish off the card.

And I am very pleased to say that Heather loves her card.

Thank you for dropping in.

Catherine x


Wednesday 24 April 2013

Word Play

Evening everyone

This evening I want to share a couple of cards I made using the cd "Word Play" from Peerless Designs.

The first card is one I made for my friend who shares her birthday with her mother - who was 90 last weekend - you may have seen the Strictly Ballroom card I posted a few days ago.  Well, like her mum, Gillian has also been a dance all her life so I wanted a dance themed card for her too.

Here it is

I took the artwork into CraftArtist to plan the card but to be honest I did very little because the artwork is so lovely.  I added a "transparent" mat behind the topper using one of the svg files on the cd which are the same shape as the topper is.  The background which is matted onto green foil card is also from the cd and I made a sentiment and added some digital ribbon to finish the card front.  Actually I managed to stick the topper on upside down and didn't even notice until hubby pointed it out to me so had to print and cut another one - which I promptly managed to stick on upside down again - fortunately this time I realised before the glue dried!  But of course I made a matching insert too.

The second card I have made from this cd was also a birthday card, this time for a male, and again, I did very little in CraftArtist.

On this one I reframed the image because I wanted it to have a black outline, added another square behind the main image and blended together two backgrounds, both from the cd, to make the background on my card.  I added the sentiment to the background and matted it onto black card.  And of course I also made a matching insert.

I don't know whether you can see the dancers on the first card or the balloon on the second card in any detail, but both images are made from words, hence the name of the cd.

Here is a close up of the balloon

It's very clever and I really like the images done in this way.

Thank you for visiting my blog.

Catherine x


Saturday 20 April 2013

Strictly Ballroom

Well, what is it they say about the road to hell being paved with good intentions?  I must be well on my way there by now then because I just haven't managed to keep up to date with my posts. 

But I am here now and I am going to share a card I made for a very special lady who was 90 years old today.  Her name is Pearl and she still goes ballroom dancing twice a week.  So what could I do but make her a ballroom dancing themed card.

I have used an image and a backing paper from the cd Strictly Card Dancers by Card Creations Plus.
And as always I took it into CraftArtist to design the card.  Here it is:

As you can see this is an easel card and I used the backing paper to make a frame for the main image, which has been decoupaged and I added a light sprinkling of glamour dust to the dancer's dress.  Both the topper and the base papers have been matted onto gold mirror card.

I have added a pop-up sentiment to the base of the card to act as the "stopper" and also some paper roses and a pair of die cut long gloves (cut with a Spellbinders die).  Three little pearls on the left side of the frame and the right side of the base complete the card.

And then of course I had to make a matching box:

The box was made using Centura Pearl card from Crafters Companion and again I have used CraftArtist to make the top and side panels for the box in the same background paper  I used on the card.   I finished it off with some white ribbon, a matching bow and another paper rose.

I was pleased with the finished card and box so I hope you like it too.

Thank you for visiting my blog.

Catherine x


Sunday 17 March 2013

Wine Buffs Birthday Card

Hello everyone

This afternoon I thought I would share another easel card with you.  This time it is a 40th birthday card I made for a friend using a cartoon image from my Wine Buffs cd from Katy Sue.  It seemed like a very appropriate image because the recipient is a wine drinker.

Here it is:

All the elements I used on this card were from the cd and I took them all into CraftArtist to design and print the card and then layered them up onto gold mirror card.

Once again I used a "stand up" stopper for the easel, this time in the shape of a wine bottle with the birthday sentiment printed onto the label.

Thank you for visiting my blog.

Catherine x

Monday 11 March 2013

Confirmation Card

Afternoon everyone

Still not doing too well with keeping my blog up to date but as I have a few minutes to spare I thought I would share a confirmation card I made for our nephew.  The big day was last Friday and as he now has the card it is quite safe to share it with you all.

As always I have used CraftArtist to design the card topper.

Here is the card


To finish the card I simply matted the topper onto stardream card in a maching colour and then onto a 15cm square white card blank.  And as always I made a matching insert.

Thank you for visiting my blog.

Catherine x

Saturday 2 March 2013

Hedgehog's Garden Adventure

Afternoon everyone

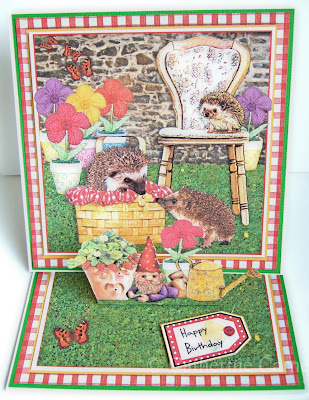
And I am back this afternoon with another easel card done in the same style as my previous two.  This time I have used the cd "Hedgehog's Garden Adventure" from Peerless Designs.  Because there are separate pngs on this cd it makes it very easy to use in Craft Artist - it also has digital stamps but I haven't had time to play with them yet.

Here is the card

The card is aprox 15x15 cm and was designed in and printed from Craft Artist again.  I have used some Coredinations green card to layer the background papers  and base images onto, and the topper is raised on foam pads, as is the sentiment tag.   I have again used a "stand up" stopper for the easel, using images from the cd.  I cut a second butterfly to layer onto the one on the base and I have just realised I forgot to put it on before taking this photograph so will have to rectify that.

Here is a close up of the "stopper"

I am very pleased with the finished card and hope you all like it too.

Thankyou for visiting my blog.

Catherine x

Wednesday 27 February 2013

A couple of easel cards

Afternoon everyone

Well so much for trying to keep up to date with my blog, though in my defence I have to say that I haven't been too well this month so my blog wasn't the only thing that wasn't being done.  But I am back today with a couple of easel cards I have made.

The first one I am going to share is a children's card and I have used two sets of digital clipart, Jungle Safari and Jungle Birthday, both from Scrapbooking Mad to make this card.

The topper on the card front is raised on foam pads, and layered ontoyellow card and  red backing paper - also included with the clipart and recoloured by me in Craft Artist.  The whole card was designed in and printed from Craft Artist.

I decided to do a pop-up stopper for this card which makes it more interesting than just a flat one.  Here is a close up of the stopper.


The second card I did in this way is a male card "Gone Fishing" and was made using clipart created by Tracy Barnes/macatelier and available from Commercial Use Scraps.  Here is the card

I created my own background papers for this card, using the colour palette in the artwork, and layered this onto blue holgraphic card.  The label shaped topper is raised on foam pads and the fishing basket and fish form the stoppers.  Again this card was designed in and printed from Craft Artist.

Both cards are aprox 6ins square and of course fold flat to fit into a standard envelope.

Thank you for dropping in.

Catherine x

Saturday 2 February 2013

Digital "Laser Cut" Topper

Afternoon all

Well I haven't done so well for keeping up to date with my blog despite my good intentions!  Thought I would just quickly share something I have been working on in Craft Artist with you this afternoon.

I decided to try to make a digital version of a "laser cut" topper and I hope you will think that I succeeded. 

Here is one I have incorporated into a card front.

This one started life as a single digital skeleton leaf.

Here is another one in a completely different style


And another one using text


I am still busy doing my homework on this style, but if you are interested in learning more about CraftArtist or this technique then please feel free to click HERE and ask to join my Facebook group.

Thank you for visiting my blog.

Catherine x

Wednesday 16 January 2013

Something Special

Good evening everyone

Well I'm doing a bit better - two posts in two days - let's hope I can keep it up now!

Today I am going to share a card I have made for the challenge at The CD Sunday Challenge Blog which this week is "Vintage Vogue".  The image and papers I have used are from the My Craft Studio cd "Something Special" and is an image I really like and kept meaning to use - you know how it is folks!

I took the image and the papers into CraftArtist and using the colours and also one of the papers I made a frame for the image.  This is how it looked in CraftArtist once I had designed it

I printed out the frame and the lady separately and layered them onto the card base when I made up the card.  Here is the finished card

To complete the card front I added a red gem to the hat.

But of course no self-respecting card is truly complete without a matching insert - so here it is all ready to personalise and print when I am going to use this card.


Thank you for dropping in to visit my blog.

Catherine x

Tuesday 15 January 2013

Des Res

Evening everyone

I'm not doing too well with this posting to my blog so far this year I think.

This evening I am going to share a photograph I took in the garden this morning - I have used it to make a card though haven't decided on a sentiment for it as yet.

Here is the card

I have decided to enter this card into this week's challenge over at Digitally Sweet Challenges ( a photo inspiration challenge this time).

Thank you for calling in.

Catherine x


Sunday 6 January 2013

Art Nouveau Ladies

Evening everyone

Today I have been making a card to enter into the CD Sunday weekly challenge, the theme of which is "Art Nouveau".  Now I don't know about anyone else, but I have a habit of getting my "art nouveau" and "art deco" images mixed up.  So I wasn't sure I had anything art nouveau, although I knew I had plenty of art deco images. I have quite a few of Sarah Hallam's cds (Peerless Designs) but not the one the DT team used.  And then I remembered these two beautiful images on my Joanna Sheen cds "Fashion".  I have used both of these images separately on more than one occasion but this is the first time I have tried them together on one card (mainly because I like them both so much I couldn't make up my mind which one to use for this challenge!).

Here is the card


The backing paper is also from the cd and the border along the bottom has been made from an image I previously coloured in CraftArtist and added a glass effect to.  I cropped the flower head out of the image and duplicated it to form the ribbon border.  The whole card has been designed in CraftArtist and will be printed out and assembled when I am ready to use it.

But of course no self-respecting card would be complete without a matching insert and here iit is, all ready to have personalised text added to it when I am ready to print it out:


Thank you for dropping in to visit my blog.

Catherine x


Saturday 5 January 2013

My Great Grandfather

Evening everyone

Well so much for good intentions - but never mind I am here now!

Tonight I am going to share a photo page I made a little while ago.  The photo is of my great grandfather who was born in 1853 and died in 1937 so lived through the "steam punk" era.  He was a boiler builder by trade but in his spare time he was a bit of an inventor.  His house was the first in the area to have electric lights, installed by him,  and family lore has it that he invented a sausage making machine.  But I don't suppose it ever occurred to him to patent it - instead he sold it to a local butcher.  Cogs and wheels seem to be very appropriate for a photo page for my great grandfather.

Here is the page


I have used a photograph of my great grandfather which was taken probably about a year before his death as the background on this page and given it a jigsaw effect.  The same photograph is in the cog at the top of the page.  The steampunk elements came from a free kit I downloaded from Algera Designs last year.

The challenge over at Digitally Sweet Challenges this week is "Steam Punk" so I thought I would enter my page.

Thank you for visiting my blog.

Catherine x

Wednesday 2 January 2013

New Year and New Baby Card

Afternoon everyone

Happy New Year to you all - may 2013 be a happy and healthy one for you all.

As my blog has been neglected recently I thought I would start the new year the way I mean to go on by making a new post.  The card I would like to share with you is a new baby card I made to welcome our great neice into the world.

Once again I chose to make a white on white card, adding only a coloured topper and sentiment.

Here is the card front

The main topper has been made in CraftArtist using a beautiful Cheryl Seslar image, which I have made into a label shaped topper.  The sentiment was also made in CraftArtist and I finished it off by adding some white spotty ribbon.

The card is 8x8 and so the insert was done in two separate pieces, which I then joined to add to the card.  Here are the two pieces

This is the left side of the insert but I have removed the personal information to upload the picture onto here.  Isn't Hallie beautiful?

And the right side of the insert

I was very pleased with the finished card and hop you all like it too!

Thank you for calling in today.

Catherine x